Connecting orgs & repositories
OAuth, SFDX auth URLs, demo orgs, and GitHub/GitLab/Bitbucket/Azure repositories.
Everything Diffbridge compares or deploys to is a connection: a Salesforce org or a git repository. Manage them under Connections. Only owners and admins can add or remove them.
Salesforce orgs
Click Connect org and choose a method:
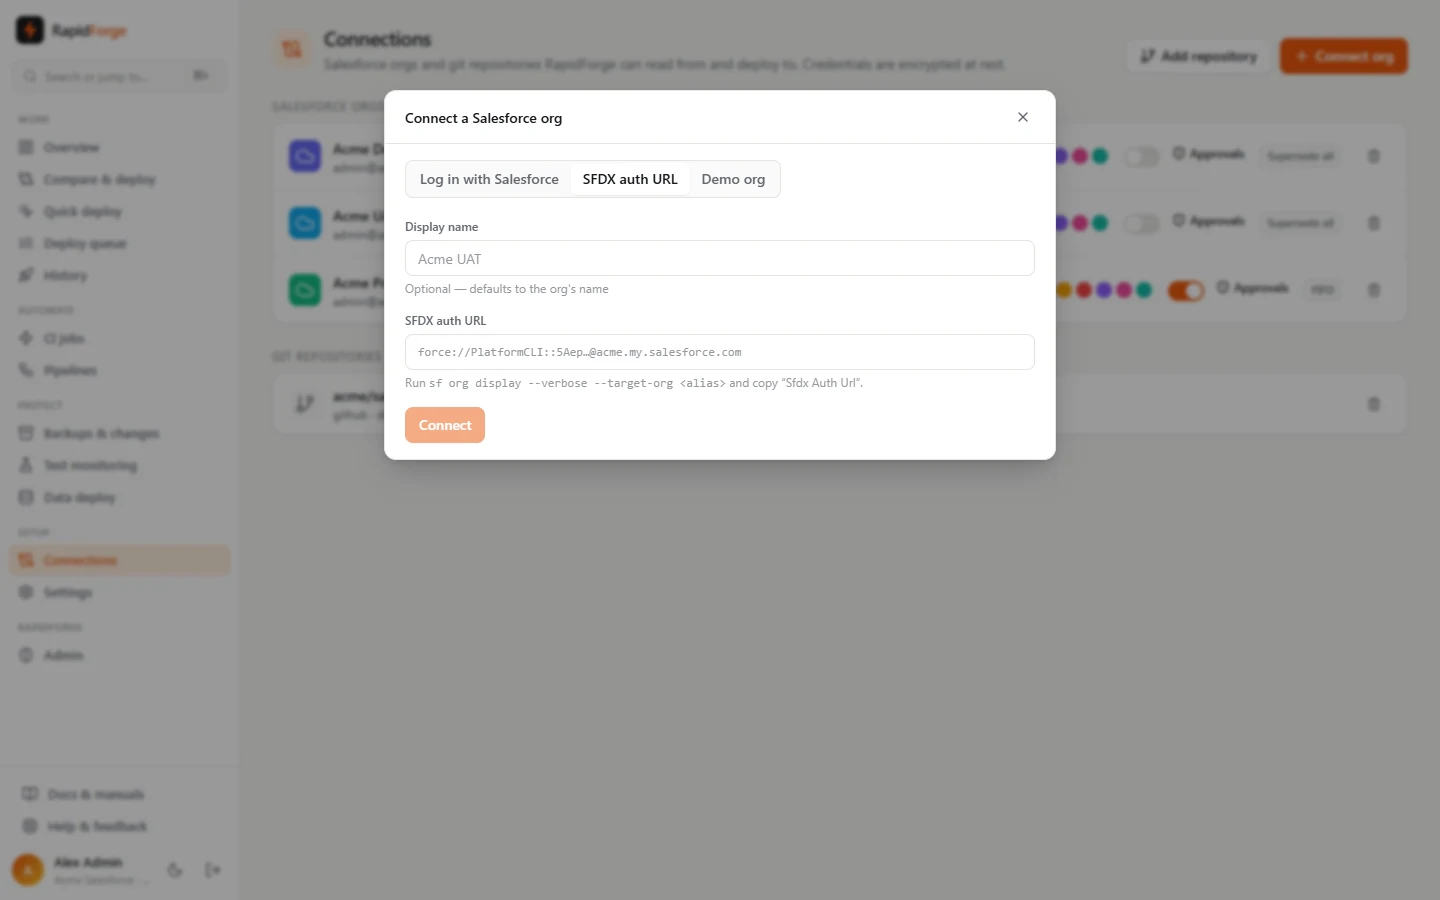
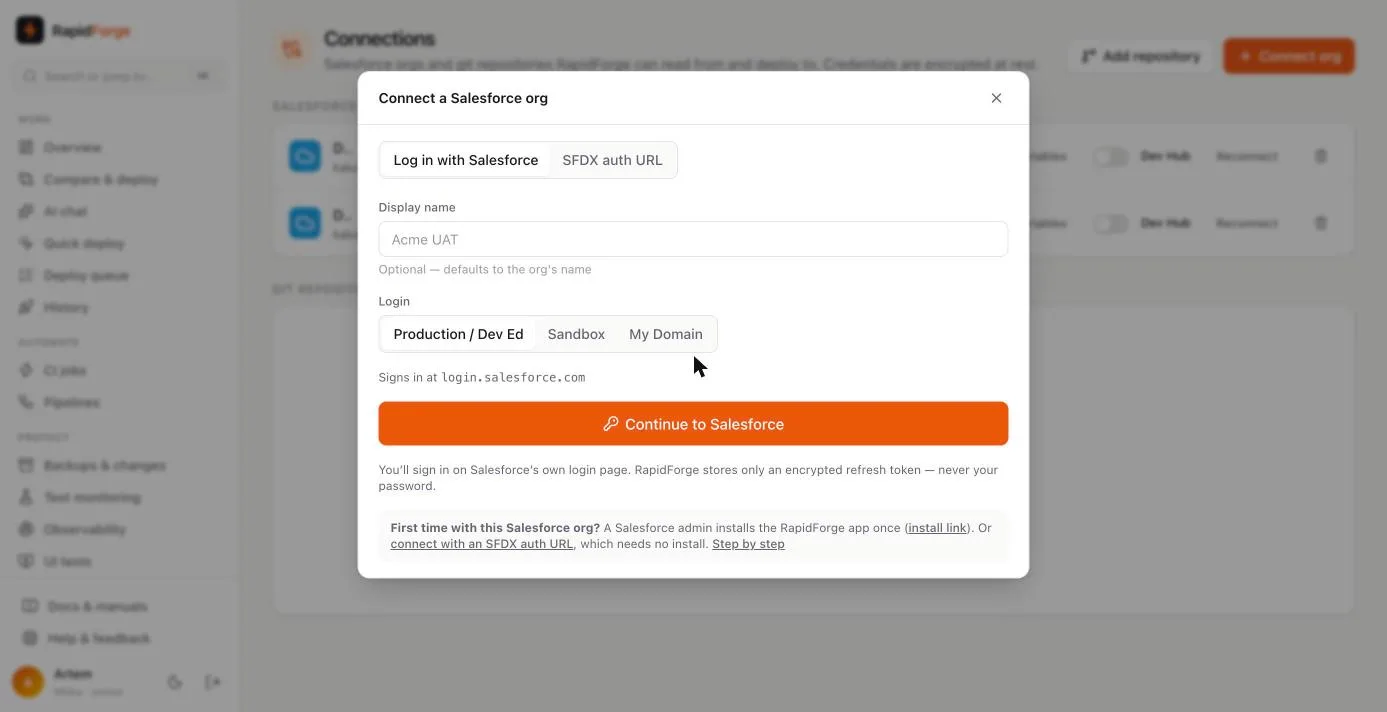
Log in with Salesforce (OAuth)
- Pick Production / Dev Ed, Sandbox, or My Domain (for example
acme.my.salesforce.com). - Optionally give it a display name, then Continue to Salesforce.
- Sign in on Salesforce's own page and approve access. You return to Connections with the org added.
Diffbridge stores only an encrypted refresh token (AES-256-GCM). It never sees your password.
First time with a Salesforce org: set it up once
Salesforce only lets an org sign in to Diffbridge after an admin has allowed the Diffbridge app in that org. There are two ways to do that. Do one of them, once per org; after that every user in the org just uses Log in with Salesforce. If you'd rather not do either, the SFDX auth URL below needs no setup.
Option 1: install the Diffbridge app (recommended, about two minutes)
In Salesforce the app is still listed as "RapidForge" (our earlier name). It is the same app: install it as shown below.
You need a Salesforce system administrator. The app is a small package published by Diffbridge: it holds only the sign-in settings, with no code, no objects and no data access of its own.
- Open the install link shown at the bottom of the Connect org dialog (for a sandbox, choose
Sandbox first: the link then points at
test.salesforce.com). Sign in to the org you want to connect when Salesforce asks.
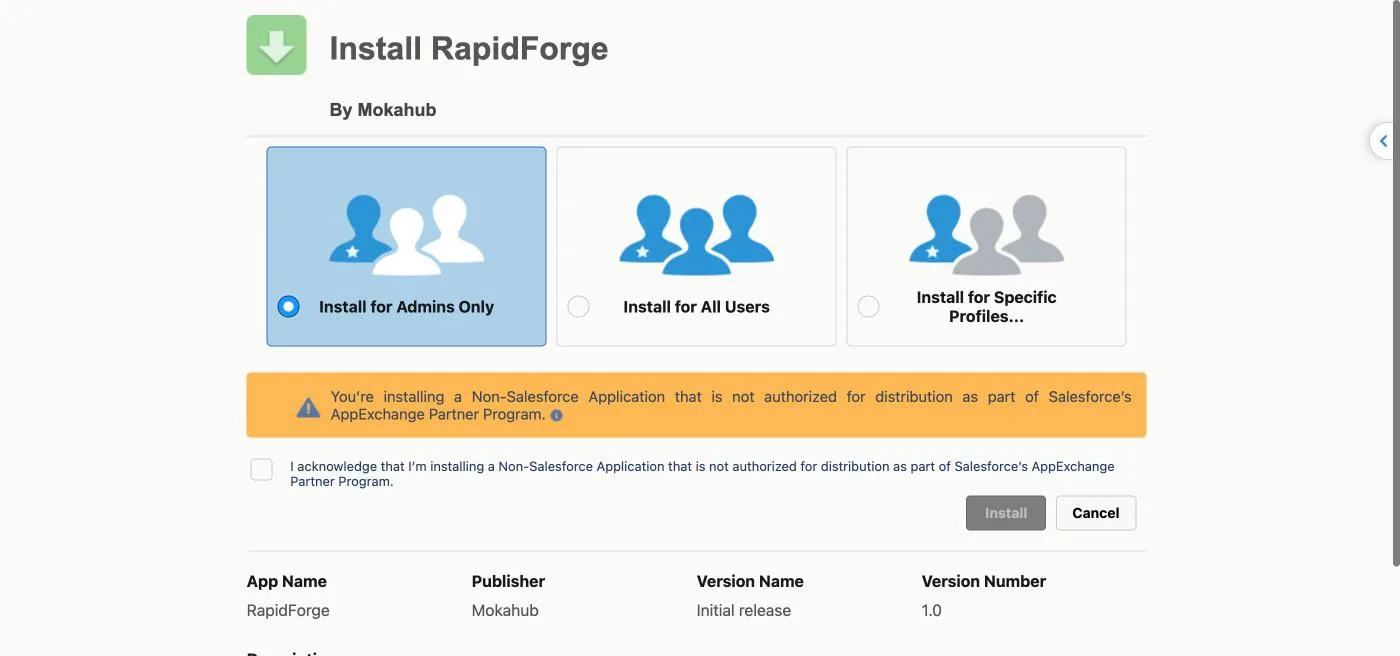
- Choose Install for Admins Only (or All Users, or specific profiles).
- Tick the notice that this is not an AppExchange app and click Install:
- Back in Diffbridge, open Connect org, choose Log in with Salesforce, and sign in.
If Salesforce answers "Cross-org OAuth flows are not supported" or "app not installed", the install in step 1–3 hasn't been done in that org yet. If a user gets an "access denied" message, ask the admin to allow the app for that user's profile or permission set in the app's policies in Setup.
Option 2: create your own external client app
Use this if your company doesn't allow installing packages, or you run your own Diffbridge server. It takes about ten minutes and a Salesforce administrator. The app lives in your own org, so it signs users of that org in.
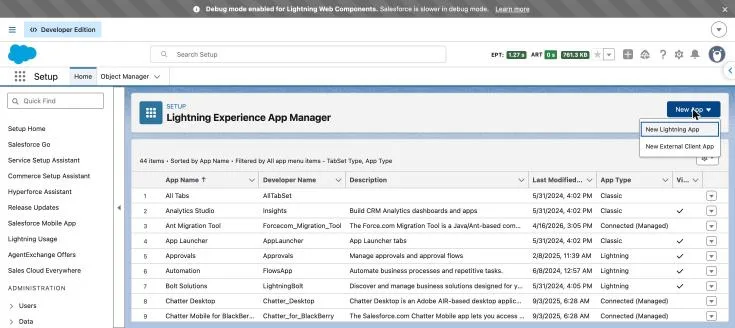
- In Salesforce open Setup → App Manager, click New App, and choose New External Client App:
- Give it a name such as
Diffbridgeand your contact email. Keep Distribution State as Local. - Under API (Enable OAuth Settings) turn on Enable OAuth and set the Callback URL to your Diffbridge
address plus
/api/orgs/oauth/callback, for examplehttps://rapidforge.example.com/api/orgs/oauth/callback. Select these scopes: Access the identity URL service (id, profile, email…), Manage user data via APIs (api), Manage user data via Web browsers (web) and Perform requests at any time (refresh_token, offline_access):
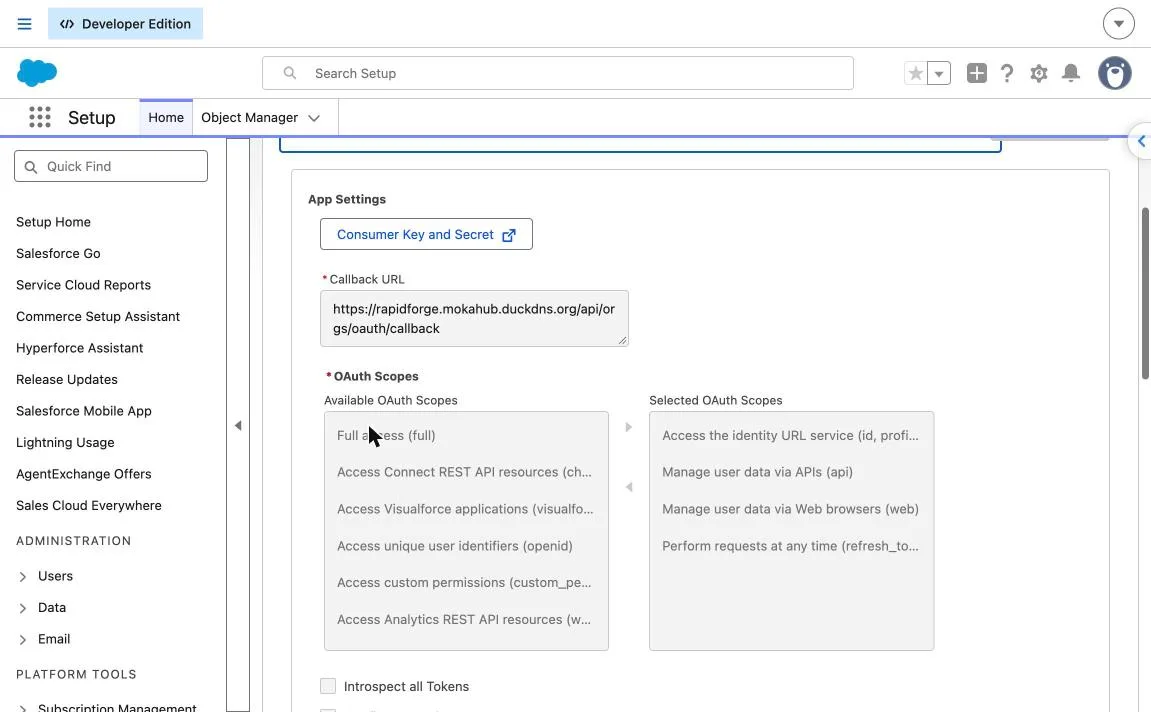
- Under Security tick Require secret for Web Server Flow. Require Proof Key for Code Exchange (PKCE) is on and can't be changed; Diffbridge always sends it. Leave the flows under Flow Enablement off:
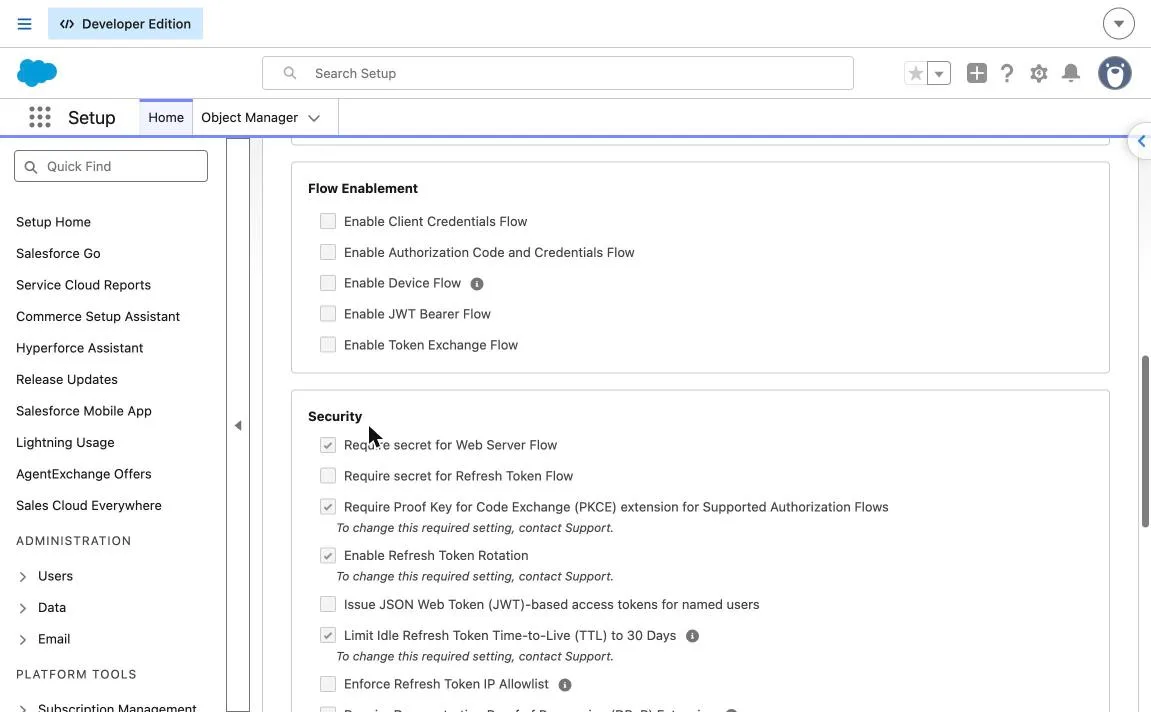
- Create the app. After a few minutes open it, go to Settings → OAuth Settings → Consumer Key and Secret (Salesforce emails you a verification code) and copy both values.
- In Diffbridge open Connect org, choose the Your own app tab (owners and admins), paste the Consumer Key and Secret, and click Save app. The secret is stored encrypted and is never shown again. The same tab shows the exact Callback URL to use in step 3.
- Back on the Log in with Salesforce tab, sign in as usual. Orgs connected this way keep working if you later remove or replace the app.
If you run your own Diffbridge server you can instead set the key and secret for everyone as SF_CLIENT_ID and
SF_CLIENT_SECRET in the server settings. An app saved under Your own app wins over the server's.
Reconnecting a stale connection
Salesforce can end a saved login: the user was deactivated or changed their password policy, the refresh token was revoked, or the org was refreshed. Diffbridge checks each connection when you open Connections and shows a red Needs reconnect badge on any whose login no longer works (a yellow Can't reach Salesforce badge means the check couldn't get an answer, not that the login is bad). Click Reconnect on the org, sign in as the same Salesforce user (via Log in with Salesforce or a new SFDX auth URL), and the connection is refreshed in place: its name, colour, approval and queue settings, variables and deployment history all stay. Signing in as a different user adds a separate connection instead.
Repositories connected with Continue with GitHub / GitLab / Bitbucket are checked the same way. If one shows Needs reconnect, click Reconnect, approve access again on the provider's page, and you return to Connections with it renewed. Every repository that shared that approval is renewed together, and their names, branches and folders stay.
Renaming a connection
Click the name of an org or a repository on Connections, type the new name and press Enter (Escape cancels). Only owners and admins can rename.
SFDX auth URL
Useful for CI service users and scratch orgs when OAuth isn't set up:
sf org display --verbose --target-org <alias> --json
Copy the sfdxAuthUrl value (it starts with force://) into SFDX auth URL.
Demo org
In demo mode you can create simulated orgs (Sandbox, Production or Developer) seeded with Latest (dev), Slightly behind (UAT), Older (production) or Empty metadata.
Scratch orgs
Turn on Dev Hub for a production or Developer Edition org that has Dev Hub enabled in
Salesforce. New scratch org then creates one from it: a name, edition, how many days it lasts
(1 to 30), optional features (such as Communities or PersonAccounts), and optionally a git
branch to load into it. Salesforce takes a few minutes; Diffbridge then connects the org and, with a
branch, deploys everything in it. Scratch orgs show when they expire; Delete scratch org removes
it from the Dev Hub too.
Real scratch orgs use your Salesforce Connected App (the same one as Log in with Salesforce).
Org settings
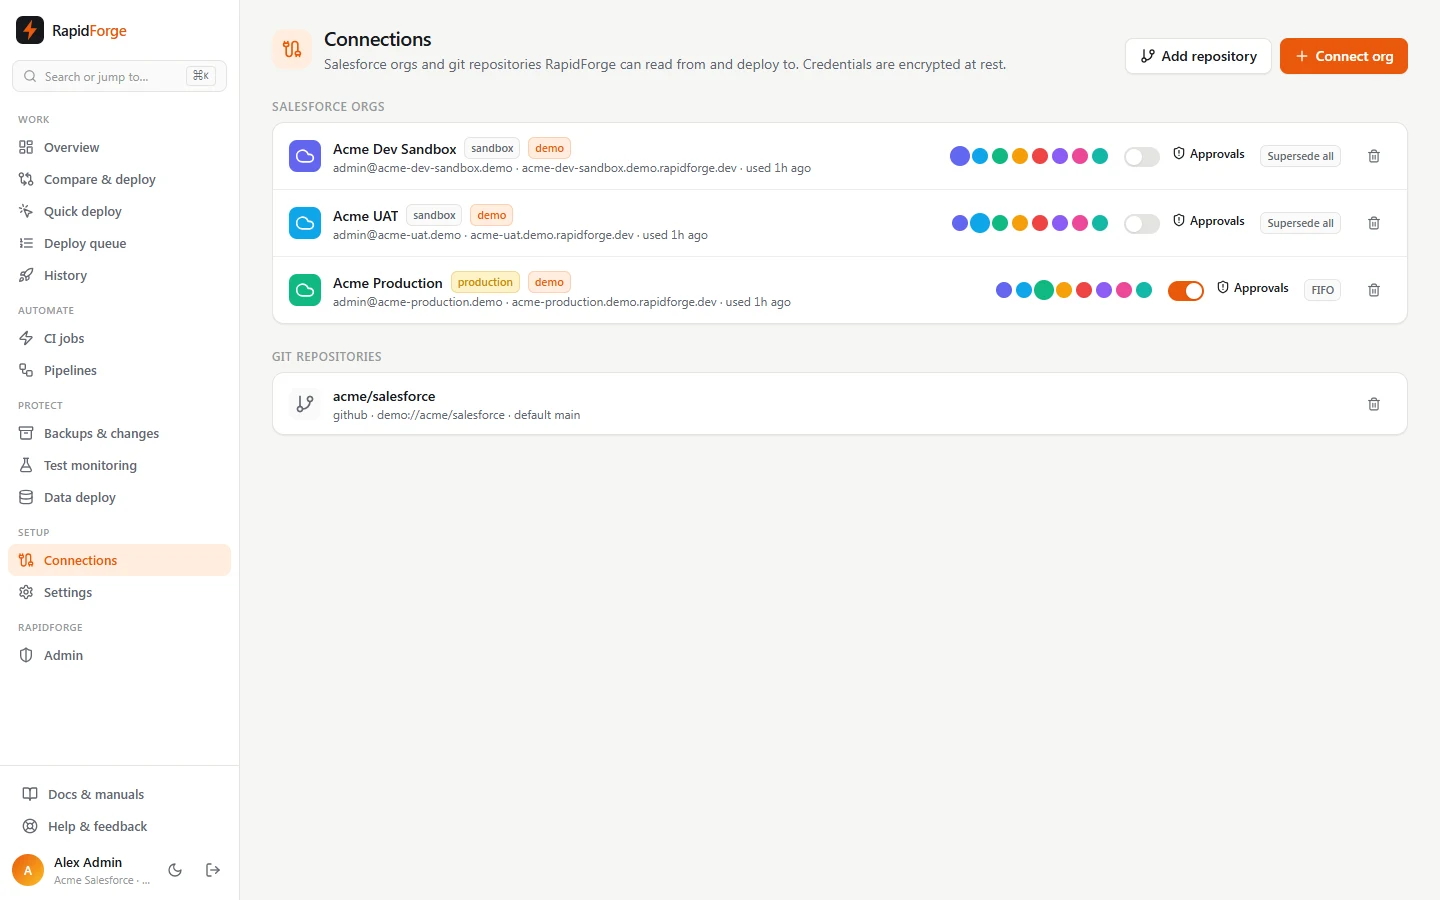
On each org row you can:
- Color: used for the org's dot everywhere in the app.
- Approvals: when on, deployments to this org by deployers wait for an owner/admin to approve. Validations never need approval.
- Queue policy: shown as a badge; change it on the Deploy queue page.
- Disconnect removes the org and its deployment history.
Mark production orgs carefully: Salesforce rules for production (test coverage, no
NoTestRunwith Apex) are applied based on the org type Diffbridge detects at connect time.
Git repositories
Click Add repository. There are two ways to connect:
Continue with GitHub, GitLab or Bitbucket
- Click Continue with GitHub (or GitLab, Bitbucket).
- Sign in on the provider's own page and approve access. You return to Connections.
- Search and pick a repository, choose its default branch, optionally set the Metadata folder, and click Add.
You never paste a token. Diffbridge keeps the approval encrypted, renews it automatically when the provider's tokens expire, and reuses it when you add more repositories from the same account (Already approved). If a provider's button isn't there, your administrator hasn't registered its OAuth app yet; see Git provider setup. Use the other tab meanwhile. Removing a repository you added this way also removes the saved approval once no other repository uses it; to revoke it on the provider's side too, remove Diffbridge from the provider's authorized apps.
URL & access token
For self-hosted servers, Azure DevOps and any other https remote:
| Field | What to enter |
|---|---|
| Name | Anything recognisable, e.g. acme/salesforce |
| Provider | GitHub, GitLab, Bitbucket, Azure DevOps, or Other |
| Clone URL | The https clone URL |
| Default branch | Usually main |
| Metadata folder | Where your metadata lives inside the repo (blank = root, e.g. force-app) |
| Access token | A personal access / app token with read and write access (stored encrypted) |
Both formats are supported and detected automatically:
- SFDX source format (
sfdx-project.json,force-app/main/default/..., decomposed objects), and - Metadata API format (
src/withpackage.xml).
When you deploy to a git branch, Diffbridge writes in the format the repository already uses (source format for new repos).
Demo repositories: a clone URL starting with
demo://creates a simulated repository. The CI page then shows Simulate a push buttons.